Display temperature and umidity
It can be useful to read temperature and umidity remotely without any browser. This can be achieved with an ESP32 module connected to an OLED display (e.g. SSD1306).
The ESP32 module can be programmed to read temperature and humidity from a web server using GET request to retrieve values and displays them on OLED display.
In order to reduce power usage, the ESP32 may sleep and be awaken using a touch button. This feature is not yet implemented in this example.
Hardware set-up
Following hardware is required to build the experiment:
- ESP32 module
- SSD1306 OLED
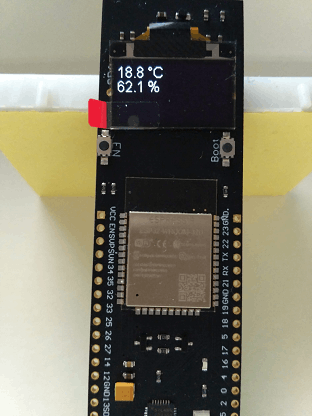
There are several boards that have both ESP32 and SSD1306, some boards provides also battery charger for 18650 battery, as the one shown in the picture on the right side 🠊🠊🠊
|
|
ESP32 software
Before writing software make sure to have installed the software development environment, downlodable from Arduino Software web site.
It may be needed to download some library if not already present. Libraries are required also to manage the external devices.
The sketch has to include the required libraries:
#include "DHTesp.h"
#include "ArduinoJson.h"
#include "Wire.h"
#include "OLEDDisplay.h"
#include "SSD1306Wire.h"
#include "SSD1306.h"
#include <WiFiMulti.h>
#include <HTTPClient.h>
The setup() function initializes the display and connects to Wifi network.
void setup () {
  display.init();
  display.setFont(ArialMT_Plain_16);
  display.drawString(0, 0, "Going online");
  display.display();
  wifiMulti.addAP(ssid, password);
  while (wifiMulti.run() != WL_CONNECTED) {
     delay(500);
  }
  display.clear();
}
The loop() function retrieves temperature and humidity from the web site and displays the values on OLED display periodically.
void loop() {
  if((wifiMulti.run() == WL_CONNECTED)) {
    HTTPClient http;
    http.begin(url);//read temperature
    int httpCode = http.GET();
    display.clear();
    if (httpCode > 0) {
        if (httpCode == HTTP_CODE_OK) {
            String payload = http.getString();
            StaticJsonDocument<200> doc;
            DeserializationError error = deserializeJson(doc, payload);
            if (error) {
              display.drawString(0, 0, "Parsing failed");
            } else {
              display.drawString(0, 0, doc["temp"].as()+" °C");
              display.drawString(0, 16, doc["hum"].as()+" %");
              display.drawString(0, 32, bar[(k++) % 4]); //progress indicator
            }
            display.display();
        } else {
          display.clear();
          display.drawString(0, 0, "HTTP Error");
          char buf[5];
          snprintf (buf, 5, "%d", httpCode);
          display.drawString(0, 16, buf);
          display.display();
        }
    } else {
      display.drawString(0, 0, "HTTP Error");
      display.drawString(0, 16, http.errorToString(httpCode));
      char buf[5];
      snprintf (buf, 5, "%d", httpCode);
      display.drawString(0, 16, buf);
      display.display();
    }
    http.end();
  }
  delay(3000);
}
Download the complete sketch here, change the secret value and the web server name, then connect your ESP module to your computer using a USB cable and upload the sketch.
Server side software
Information is retrieved from MySQL database when a GET request is received. The script renders information in following formats:
The main part of the functionality is provided by the esp32_client.php script, change the mysql credentials and then upload it to your webserver.
|