How to show time, temperature and humidity
The Arduino board itself is not able to provide information like temperature and humidity. Specific sensors are needed to read physical properties. This example uses the AM2302/DHT22 device, that provides calibrated digital signal output of the temperature and humidity. Measuring time requires another device, an Real Time Clock (RTC) module, e.g. the DS1307 that provides real-time clock with 56 bytes of non-volatile RAM, full BCD code clock and calendar. The measured properties are shown on a liquid crystal display (LCD), a SainSmart LCD2004 in this example, that can be controlled by an I²C interface. The following figure shows the main parts of this Arduino experiment: 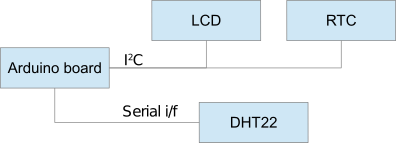 Hardware set-up
Following hardware is required to build the experiment:
Please proceed with the following connections, without any power connected:
Confused about all three-letters acronyms? Here is a brief explanation: GND is the ground line, Vcc is the positive supply line, SDA is the serial data line, SCL is the serial clock line. This example uses serial I/O to demonstrate the easy wiring of serial protocols. Now proceed with next section Software. Software
Before writing software make sure to have installed the software development environment, downlodable from Arduino Software web site. It may be needed to download some library if not already present: RTClib, LiquidCrystal_I2C and DHTlib (some googling will help you finding the appropriate libraries). Libraries are required to manage the external devices. For this reason the sketch has to include the required libraries: The setup() function has to initialize libraries features: The loop() function does the job: Download the complete sketch here, then connect your Arduino Uno board to your computer using a USB cable and upload the sketch to the Arduino board. Now the digital clock will start! LCD Clock in action
Here is a picture of the LCD showing time, temperature and humidity: 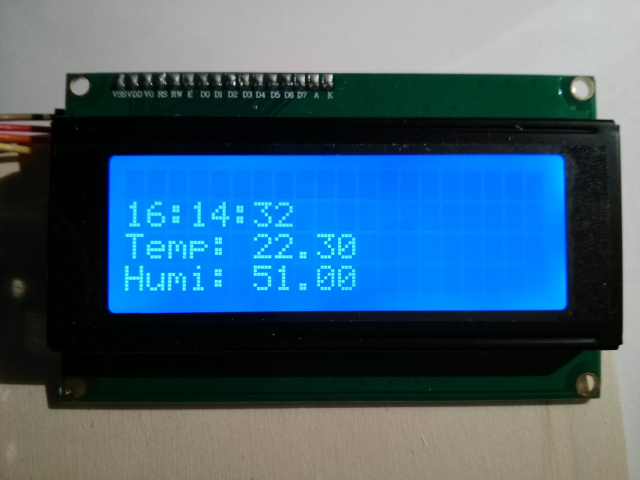 |