Measure temperature and umidity

Even the powerful ESP32 module itself is not able to provide information like temperature and humidity. Specific sensors are needed to read physical properties. This example uses the AM2302/DHT22 device, that provides calibrated digital signal output of the temperature and humidity.

The ESP32 module can be programmed to read temperature and humidity from the AM2302 device and then POSTs the temperature and humidity values towards an external web server, where data are stored and showed by a script. In this experiment a PHP script is used in the web server. In order to reduce power usage, the ESP32 sleeps between two consecutive measurements.

Hardware set-up

Following hardware is required to build the experiment:
  • ESP32 module
  • AM2302/DHT22 device
  • resistor 5.1kΩ
Implement following connections:
  • Connect GND(ESP32) together with GND(AM2302/DHT22)
  • Connect GPIO22(ESP32) together with Vdd(AM2302/DHT22)
  • Connect GPIO16(ESP32) to SDA(AM2302/DHT22) together with a pull-up resistor (5.1kΩ)

Confused about all three-letters acronyms? Here is a brief explanation: GND is the ground line, Vcc/Vdd is the positive supply line, SDA is the serial data line, GPIO is generic purpose Input/Output.

The following picture shows the IoT device breadboard:
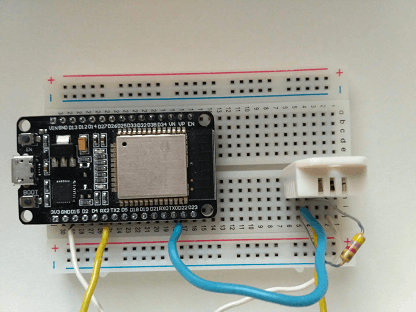
 IoT device breadboard

ESP32 software

Before writing software make sure to have installed the software development environment, downlodable from Arduino Software web site. It may be needed to download some library if not already present. Libraries are required also to manage the external devices.

The sketch has to include the required libraries:

#include <WiFi.h>
#include "esp_deep_sleep.h" //Library needed for ESP32 Sleep Functions
#include "DHTesp.h"


The setup() function performs all the logic for the IoT sensor and then it goes to sleep.

void setup () {
//poweron DHT sensor
  pinMode(dhtVdd, OUTPUT);
  digitalWrite(dhtVdd, HIGH);
// initialize the DHT sensor
  dht.setup(dhtSda, DHTesp::DHT22);
    
  WiFi.begin(ssid, password);
  int max_retries = 20;
  while ((WiFi.status() != WL_CONNECTED) && (max_retries-- > 0)) {
    delay(500); 
  }

  if (WiFi.status() == WL_CONNECTED) {//send data if wifi is connected
// Sensor readings may also be up to 2 seconds 'old' (its a very slow sensor)
    TempAndHumidity newValues = dht.getTempAndHumidity();    
    if (dht.getStatus() != 0) {
      doPost("DHT error status: " + String(dht.getStatusString()));
    } else {
// Computes temperature values in Celsius + Fahrenheit and Humidity
      float hic = dht.computeHeatIndex(newValues.temperature, newValues.humidity);
      dtostrf(hic, 6, 2, celsiusTemp);             
      dtostrf(newValues.humidity, 6, 2, humidityTemp);
     
      doPost("{\"v\":1,\"temp\":"+String(celsiusTemp)+",\"hum\":"+
	    String(humidityTemp)+",\"secret\":\""+
		String(secret)+"\"}");//POST with json parameters
    }
  }
//poweroff DHT sensor
  digitalWrite(dhtVdd, LOW);  
  esp_deep_sleep_enable_timer_wakeup(UpdateInterval);
  esp_deep_sleep_start();
}


In this example the loop() function is not used.

Download the complete sketch here, change the secret value and the web server name, then connect your ESP module to your computer using a USB cable and upload the sketch.

Server side software

Information is received by the server in a POST request. The information is encoded in JSON format, including a secret value used to check that the information is really sent by the IoT device. The received information is stored in MySQL database after security check.

define("secret", "rshe*i76"); // <-- change secret value here and inside sketch ESP_sensor.ino
The main part of the functionality is provided by the esp32_post.php script, change the secret value and mysql credentials and then upload it to your webserver.

Share Share on Facebook Share on Twitter Bookmark on Reddit Share via mail
Creative Commons Attribution-Share Alike | Terms and conditions | Privacy policy